


- Home
-

- Blog
-
- How to Guide Blogs
-
- How to Properly Set Up Your Google Analytics Tracking
How to Properly Set Up Your Google Analytics Tracking

How To Guide For Setting Up Your Google Analytics Tracking Correctly
Creating and configuring your Google analytics tracking is the first step towards optimising your google ad campaigns and getting the best return possible for your ad spend. However, a Disruptive Advertising Google Ads analysis found that a massive 42.3% of Google Ads accounts have no conversion tracking in place.
Key Takeaways
-
Without tracking, 42% of Ads accounts can’t measure conversions.
-
Guide walks through creating GA account/property and linking GA4 with Ads and CRM.
-
It explains GA4 setup for site-wide tracking and enhanced event tracking.
-
Shows how to configure Ads/CRM conversion tracking to close the loop on acquisition
-
Proper integration ensures accurate ROI measurement across paid and organic channels
Without conversion tracking, you’re flying blind when it comes to analysing and improving your campaigns. Bottom line is, you NEED to know the results your Google Ads campaigns are driving to ensure your ads are working hard for your goals.
In this six-step guide, we take you through how to correctly set up and track conversions across Google Ads, Google Analytics, and a third-party CRM platform.
Getting Started: How to Set Up Your Google Analytics Account the Right Way
Before you can unlock powerful insights about your website traffic, you need to set up your account correctly. To get started with Google Analytics, visit the Google Analytics homepage, sign in with your Google account, and follow the setup wizard to create a new property.
During this process, it’s important to choose the correct reporting time zone—ideally set to your local Australian time (e.g., AEST or AWST)—so your data accurately reflects when users are visiting your site. Setting this up properly from the beginning ensures your reports, user activity, and conversion tracking all align with your business hours, helping you make better-informed marketing decisions.
Next we explain how to set up your GA and GA4 for general tracking:
Google Analytics Set Up (GA4) for General Tracking
Before diving into Google Ads tracking, it’s essential that your Google analytics set up is correct so it can capture general website data. GA4 is the latest version of Google Analytics, offering more advanced features and improved tracking capabilities over the previous Universal Analytics.
Here’s a step-by-step guide to setting up GA4 for general tracking on your e-commerce site:
Create a Google Analytics Account
If you don’t already have a Google Analytics account, the first step is to create one. Head to Google Analytics and sign in with your Google account. Once logged in, click on the “Admin” button located at the bottom left of your screen, then select “Create Account”. Follow the prompts to complete the account setup.
Google Analytics Set Up For Your GA4 Property
After creating your account, you’ll need to set up a GA4 property to collect data on your website. When setting up your property, choose “Web” as the platform for your data collection. Google will guide you through entering your website’s name, URL, and time zone. Make sure you select GA4 as your property type to use the new features.
Install the Global Site Tag (gtag.js) on Your Website
Once your GA4 property is created, you’ll need to install the tracking code on your website. This is done through the Global Site Tag (gtag.js), which tracks user interactions across your site. In the “Data Streams” section of GA4, select “Web” and enter your website details. Google will provide you with a unique tracking code to install on your website. You can either manually add the code to your website’s header, or if you’re using a platform like WordPress or Shopify, you can use their integrated tracking tools for easier setup.
Google Analytics Set Up of Enhanced Measurement for Automatic Tracking
GA4 offers an Enhanced Measurement feature, which automatically tracks key user interactions like page views, scrolls, outbound clicks, and file downloads without needing additional code. To enable this, navigate to your GA4 property, click on “Data Streams”, and under your web stream, toggle Enhanced Measurement on. This will enable automatic event tracking, providing valuable insights into user behaviour on your website.
Configure Events for Specific Actions
GA4 allows you to track specific events on your website, such as purchases, form submissions, or button clicks. You can either set up custom events or use the “Event Setup Tool” in GA4 to easily create tracking for important actions on your site. To access this tool, go to your “Events” section in GA4, click on “Create Event”, and follow the prompts to define your custom events.
Google Analytics Set Up For Goals (Conversions) in GA4
Unlike Universal Analytics, GA4 doesn’t use the traditional “Goals” feature. Instead, GA4 uses Conversions to track specific actions that matter most to your business, such as completing a purchase or submitting a contact form. To set up conversions, go to the “Conversions” section in GA4, and choose the events you want to track as conversions (such as a thank-you page load or a specific button click).
Link Google Analytics 4 to Google Ads
For more detailed tracking and better integration between your GA4 property and Google Ads campaigns, you’ll need to link the two platforms. This allows you to track ad performance, see how users interact with your site after clicking an ad, and optimise your campaigns for better results. This step will be covered in the next section of the article, “Setting Up GA For Google Ads,” where we dive into how to connect GA4 to Google Ads for targeted tracking and better performance measurement.
When setting up GA4 for general tracking, you need to ensure that you’re capturing valuable user data that will inform your marketing strategies. With enhanced features like event tracking, automatic measurement, and conversion setup, GA4 offers an in-depth understanding of user behaviour on your site, providing a solid foundation for successful marketing campaigns and optimising your e-commerce efforts.
Google Analytics Set Up For Google Ads:
1. Install and verify your Google Ads tracking code
If you haven’t done this, hit ‘pause’ on your Google Ads campaigns IMMEDIATELY. Installing and verifying your Google Ads tracking tag is the absolute first thing you need to do before getting your campaigns up and running.
Good news: it’s not at all hard to set up. However, in our experience, we’ve seen clients’ conversion tags not firing properly, time and time again. At the end of the day, this hurts your reporting AND your ability to optimize your campaigns in the future.
So how do you set it up?
Start in your Google Ads dashboard, and head over to Tools > Measurement > Conversions. Once you’re on here, you’ll be prompted to create a new conversion type, such as the sales on your website or the number of calls from your ads:
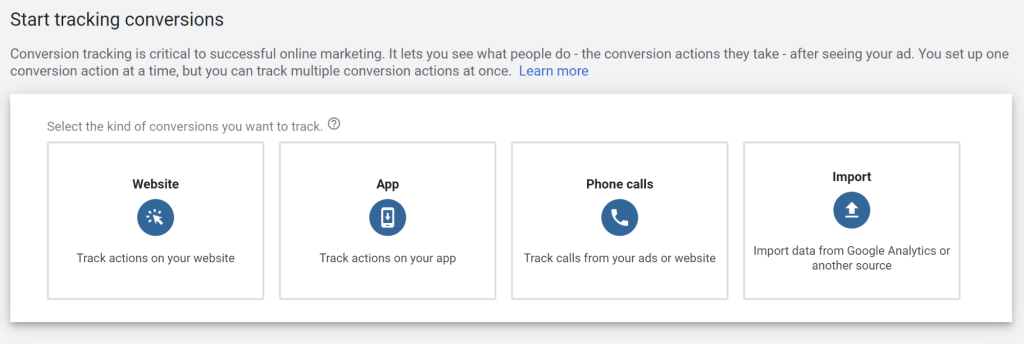
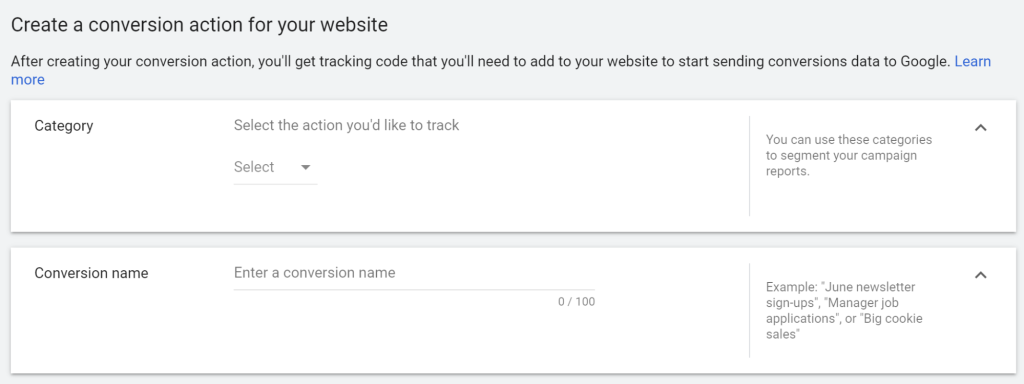
After this, name your conversion and pick your conversion category. It might be something like “Add to cart page” or “New lead sign-up”.
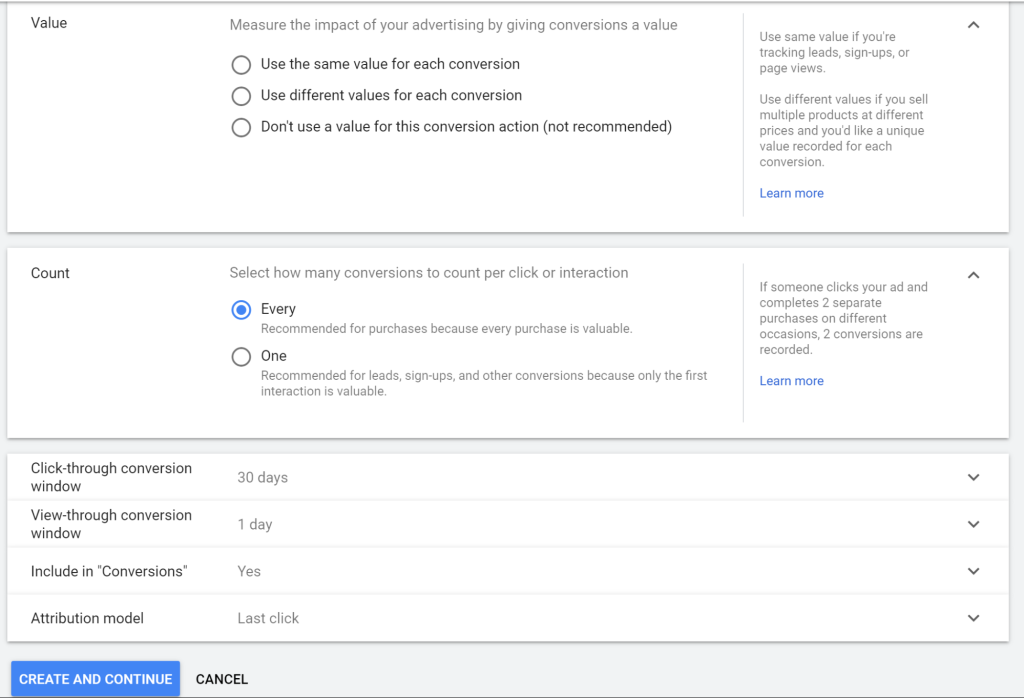
After this, you can set a value for your conversion (if you know it), and how many conversions to count per click or interaction:
Done? Now it’s time to install your conversion tracking tag.
You’ll see two tracking tags in Google:
- The Global Site Tag: this can be used on all web pages, and for both conversion tracking and remarketing. This snippet will always stay the same on every page of your website.
- Event Code: This code tracks different types of conversions in detail, such as leads generated, phone calls, key page views, email newsletter sign-ups, and more. You’ll need to create a specific one for each conversion goal, and put this immediately after your global site tag on every page that you want to track.
When you have your tags, ask your developer to install the Global Site Tag and Event Tracking codes. Once you’ve done this, you need to verify that your Google Ads conversion tracking tag is working with Google Tag Assistant.
Follow these steps:
- Install the Google Tag Assistant Chrome extension.
- Open the “thank you” landing page or the web page you’re tracking that is a “success” after the desired action and then check the Tag Assistant.
- You should see “Adwords Conversion Tracking” firing correctly in blue. If it happens to be in red, then that means there is an issue.
2. Check you’re tracking the right conversions
It’s not enough just to have tracking. You need to be tracking the RIGHT conversions on the right pages, buttons, and calls if you want to truly evaluate the success of your Google Ads campaigns.
There are a few things you can track across your site, including:
- Webpage conversions, such as when someone makes a purchase or sale, when someone signs up via a form, when a lead submits a contact us request or when a key page is viewed (i.e. a ‘plans and pricing’ page).
- Call On-Site conversions that track when someone calls your business phone number directly from their phones.
- App conversions if you have an app available on the Google Play Store. App conversions can also be tracked to the iOS store for the ads that are served in mobile apps across the Google Display Network.
Make sure you properly understand your customer journey, then set up conversions to track key events along the way. You can also track multiple conversion actions for the same desired conversion — for example, a form submission can be a webpage conversion and a lead generation request.
3. Link your Google Ads and Google Analytics Tracking Accounts
You need to have your Google Ads and Google Analytics accounts linked together for comprehensive reporting. This is because while Google Ads is GREAT at tracking actions on the platform, it offers up a pretty limited amount of data once someone lands on your website and you want to track their behavior flow.
This step is often the missing link between connecting your marketing actions with your revenue, giving you insights into which campaigns drive valuable actions on your websites and apps. That’s because linking your Google Ads and Google Analytics accounts can help you understand:
- Which keywords / campaigns are have better pages/sessions
- Which keywords / campaigns provide longer session times
- Which keywords / campaigns have the highest engagement and lowest bounce rate
- Where people are navigating to once they visit your website
- Where potential customers are getting stuck along the user journey
- Which content they’re engaging with once they land on your site
Connecting your Google Ads with Google Analytics also opens up countless opportunities for retargeting, and allows you to block advertising to people who have previously purchased.
So how do you link the two?
- Sign in to Google Analytics, click on Admin, and navigate to the property you want to link.
- In the Property column, click Google Ads Linking and select + New link group.
- Select the Google Ads accounts you want to link, then click Continue.
- Enter a link group title, and turn linking ON for each view in the property in which you want Google Ads data.
- Optional: select Enable Google Display Network Impression Reporting if you want to include this data in your view as well.
- Manually tag your Google Ads links by clicking on Advanced settings > Leave my auto-tagging settings as they are. If you’ve enabled auto-tagging in your Google Ads accounts, you can skip this step.
- Click Link accounts.
4. Use Google Analytics Tracking and Google Tag Manager to ensure your tags are firing correctly from start to finish
Following on, it’s crucial that you and your team are across the user behavior flow of Google Ads campaigns and any other external paid media activities you’re currently running. But first things first: you need to make sure everything is working properly
It’s important to have all tags and key user behavior tags firing to get an in-depth understanding of how to improve conversion rate optimization (CRO) and the user experience (UX) of your website.
Here are some of the most common mistakes we’ve observed that might be affecting your tags:
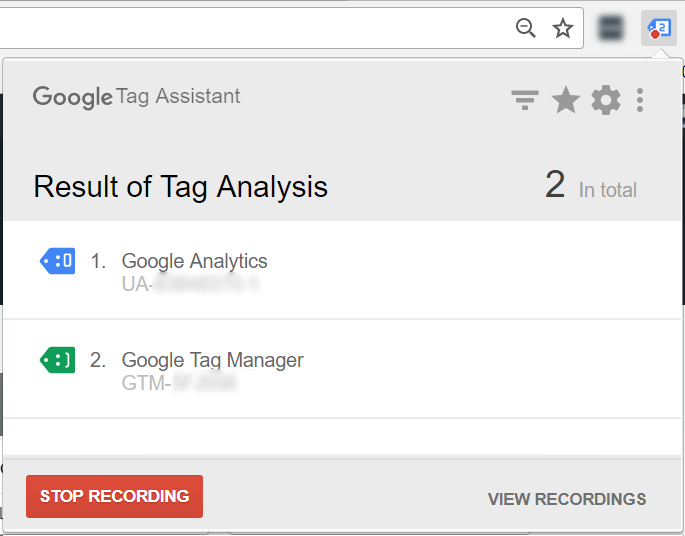
Mistake 1: Viewing the wrong Google Tag Manager account
If you’re tracking multiple sites or using multiple Tag Manager accounts, you might be using the wrong snippet from one account or container by accident.
Check whether your Google Tag Manager account is the same as in the code on your site:

Image source: Analytics Mania
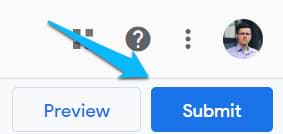
Mistake 2: Not publishing the container
If you have everything set up but you’re seeing WAY too little data, chances are you might have forgotten to publish the container altogether.
You can avoid this by testing and going ‘live’ on your GTM interface by hitting the ‘submit’ button:
Mistake 3: Not completely removing old Google Analytics implementation
One of the biggest challenges that advertisers encounter is when they try to migrate from hardcoded Google Analytics to a more flexible Google Tag Manager implementation. If you’re a smaller website, this is easy: all you need to do is add a GTM container snippet, publish your tag and remove the previous GA tracking code from your site.
However, if you’re running a large site, you (or your developers) might forget to remove hardcoded link tracking events, which in turn can cause duplication of data. If you’ve recently changed from GA to GTM and you’re seeing issues with your tracking, a rogue old code could be the culprit.
Mistake 4: Tracking too many events or using too many auto-event listeners
Data is great, but having too much data can slow your GTM containers to a grinding halt. Every line of code is an action that needs to be executed, and the more codes you have, the slower your website becomes.
Create a measurement plan with key events that you want to track, and focus ONLY on tracking these. If you’re already using a bunch of auto-event listeners, go back and look at which ones you’ve used over the past 6 months or year. Eliminate any that you don’t need, and you’ll be able to cut through the noise to measure the numbers that matter.
Mistake 5: Having typos in the code
This one seems like a no-brainer, but you’d be surprised how often it happens. You might have a typo in your trigger conditions, or in the names of variables — or you may have put a lowercase “s” instead of an uppercase one (most GTM fields are case-sensitive).
Read Our Guide To Common Google Analytics Tracking Mistakes (and How to Avoid Them)
5. Install button tracking via Google Tag Manager
While this one is entirely optional, tracking button clicks can be incredibly telling when it comes to user behavior. It’s easy to set up, and you can’t underestimate the value of having the best data set at your fingertips.
Work with your developers to set up button tracking using these steps:
- Find your button on your website (for example, a ‘Contact us’ button or a ‘Add to cart’ button).
- Right-click the button to view the source code. Check the button class, as you will need to configure different triggers in GTM.
- Enable the variable in GTM by selecting Variables > Configure > Built-in Variables. Add your button class in here, based on your findings in step 2.
- Create a tag in GTM by selecting Tags > New and naming your tag. After that, head to Tag Configuration, select Google Analytics, and change ‘Pageview’ to ‘Event’. From here, you can set up your button click as an event that is reported in Google Analytics.
- Create a trigger to tell Google Tag Manager when a tag should (or shouldn’t) fire. You want your trigger only to fire when the button has been clicked. Select ‘Triggering’ for the tag, click on the blue plus sign to create a new trigger, name it, then configure it based on the variable you found in step 2.
- Preview the container in Google Tag Manager to make sure everything is working as it should.
- Now it’s time to test it in Google Analytics. Head over to GA, select ‘Real-Time’, then Events. From here, you’ll be able to see whether your tag is firing correctly.
- Once you see the data, it’s time to head back to GTM and publish the container.
As a general rule of thumb, it’s a good idea to start tracking button clicks after you pass the 3,000 unique visitors mark.
After this is done, you can view it with Google Analytics (or your preferred analytics tool) to create advanced behavior flows and better map your user’s journey. This is amazing for making improvements in UX and CRO.
6. Track and analyze performance via another sales, marketing and CRM platform
Google Analytics is a powerful platform, but it has its limitations. If you want to truly evaluate the entire buyer journey, consider using an end-to-end platform like Salesforce, InfusionSoft, Marketo or Hubspot. These tools help you track your analytics from all sources coming to your websites and apps, and allow you to follow that through as sales convert into your CRM system.
“Having an accurate picture and understanding end-to-end from campaigns you’re running, interaction on your site and within your app, goals, and then onboarding flow process of users can really help make better growth / marketing decisions across your entire web and app ecosystem..
This can be invaluable for your team when it comes to monitoring trends, assessing touchpoints, and closing opportunities. Of course, it’s easier said than done to get this all set up. However, it’s worth the investment and time to get it right.
How to Start Measuring Your Online Presence with Google Analytics Setup
Setting up Google Analytics correctly is a crucial first step for any business looking to start measuring the performance of their websites and apps and optimise their online presence. To begin, you’ll need to create a Google Analytics property for your site, which acts as a central hub for all your tracking data.
During the setup, one important step is selecting the right industry category for your business. This helps Google Analytics tailor your reporting and benchmarks to businesses similar to yours, providing more relevant insights. Once your Google Analytics property is created and linked to your website, you’ll start receiving data such as traffic sources, user behaviour, and conversions.
It’s also essential to set your reporting time to match your business needs. Whether you want daily, weekly, or monthly reports, customising this setting ensures you receive data at the right frequency for your analysis and decision-making.
With the right setup, Google Analytics becomes a powerful tool for tracking performance and improving your site’s online presence, allowing you to make informed decisions that drive growth and success.
Also, when setting up Google Ads Analytics tracking, it’s crucial to:
- Link Accounts: Connect Google Ads and Google Analytics for seamless data exchange. This ensures accurate data synchronization between Ads and Analytics, enabling comprehensive insights for performance optimization.
- Conversion Tracking: Set up specific goals to track key actions like sales or leads. Without tracking specific goals (like sales or leads), you can’t measure the true effectiveness of your campaigns.
- Use UTM Parameters: Properly tag URLs for precise tracking. Tagging URLs with UTM parameters allows for detailed tracking of traffic sources, providing clarity on campaign performance.
- E-commerce Tracking: For e-commerce, ensure product performance is monitored. For e-commerce businesses, this helps monitor product-specific performance, boosting ROI by identifying which products are driving sales.
- Testing: Test tracking to ensure all data is accurately captured. Ensures that the tracking is correctly set up and that no data is missed, preventing inaccurate insights.
Correct tracking setup is key for informed decision-making and optimising your campaigns.
A Look At The Top Most Common Google Analytics Tracking Mistakes
Google Analytics is a marketer’s best friend if set up correctly. It helps you understand how your customers are behaving, pinpoint gaps in your online marketing strategy, and guide future investments. But Google analytics tracking mistakes can create all kinds of issues so we explore how to get your tracking right.
If your data collection is flawed, you’re at risk of making bad business decisions or sinking money into actions that don’t deliver.
Having duplicate tags, for example, could lead to double-ups and skew your reporting. On the other hand, if you haven’t set up your interaction events properly, you may be tracking actions that ultimately don’t bring you closer to your end goal.
You NEED to get your Google Analytics running smoothly if you want to have data that you can reliably trust and act on.
But how do you correct Google Analytics mistakes if you don’t even know what you’re looking for?
That’s what we’re here to fix.
Why Setting Up Your Google Analytics Account Correctly is Crucial for Your Business?
Google Analytics is one of the most powerful tools available to measure and analyze your website’s performance. However, if your Google Analytics account isn’t set up correctly, it can lead to inaccurate data, which can result in poor decision-making, lost opportunities, and wasted resources.
Correctly configuring your Google Analytics account is essential to getting the most out of the tool and ensuring that you’re getting actionable insights that will drive your business forward.
Here’s why it’s so important and why fixing any mistakes right away is critical:
Accurate Data Collection for Informed Decision-Making
When your Google Analytics account is set up properly, it collects accurate data about how visitors are interacting with your website, including traffic sources, user behavior, conversion rates, and more. This data is invaluable for making informed decisions about your marketing strategies, user experience improvements, and content creation.
If your Google Analytics account is misconfigured, you could end up with skewed data, such as incorrect traffic sources, misleading user behavior reports, or faulty conversion tracking. Making decisions based on incorrect data could lead to ineffective marketing campaigns, missed business opportunities, and a lack of understanding about what’s really driving your website’s performance.
Effective Tracking of Marketing Campaigns and ROI
Google Analytics helps track the performance of all your digital marketing efforts, from paid social media ads to Pay-Per-Click / PPC ads to email marketing campaigns. If you set up campaign tracking (via UTM parameters) incorrectly, or if your goals and events aren’t configured properly, you won’t be able to measure the ROI of your campaigns accurately. This means you could be spending money on marketing strategies that aren’t working, or worse, missing out on successful campaigns that are delivering valuable results.
Setting up your Google Analytics account correctly allows you to track specific actions, like form submissions, clicks on certain buttons, or e-commerce transactions. Without these key metrics, you wouldn’t be able to measure success and make necessary adjustments to your campaigns.
Insight into User Behavior and Conversion Paths
Google Analytics provides deep insights into how users interact with your website. You can see which pages they visit, how long they stay, which pages have the highest bounce rates and where they drop off in the conversion process. This data is critical when optimizing your website for content and design to increase engagement and conversions.
If your tracking isn’t set up correctly, you may miss out on identifying issues in your user flow or key conversion points. For example, you might not notice that visitors are abandoning their shopping carts or bouncing from a specific landing page. This means you might not act quickly enough to make the necessary changes to improve your website’s user experience.
Reliable Conversion Tracking for Business Goals
Conversion tracking is crucial for measuring whether your website is achieving its business goals. Whether your goal is to generate leads, increase you revenue and sales online, drive more website traffic or increase newsletter signups, you need reliable conversion tracking in place to see how well your website is performing in these areas.
Misconfigured tracking, such as setting up the wrong conversion goal or missing important interactions, can cause you to miss valuable data on your website’s true performance. This can result in missed opportunities to improve your conversion rates and generate more business.
Time-Saving and Efficiency
Fixing Google Analytics issues after they occur can be time-consuming and can lead to delays in making necessary optimizations. If your account is incorrectly set up from the beginning, it could waste a significant amount of time, especially when you need to fix problems after you’ve already accumulated a lot of inaccurate data.
The sooner you set up Google Analytics correctly, the less time you’ll need to spend correcting errors and ensuring that your reporting is accurate. Fixing mistakes as soon as you notice them helps ensure that you’re using your time efficiently, rather than having to sift through problematic data or spend resources on manual fixes.
Better Understanding of Your Traffic Sources
Google Analytics tracks where your traffic is coming from—whether it’s organic search, paid ads, social media, or referrals. Misconfigurations in your Google Analytics account, such as improperly tagged URLs or missing UTM parameters, can cause traffic sources to appear incorrectly. For example, paid search traffic could show up as organic traffic, making it impossible to assess the effectiveness of your ad campaigns.
Accurate traffic source tracking is crucial for understanding where your most valuable visitors are coming from. If you’re not tracking traffic sources correctly, you might miss opportunities to optimize high-performing channels, or you may continue to spend resources on underperforming ones.
Preventing Data Sampling and Missing Reports
When Google Analytics isn’t set up correctly, it may start sampling your data, which can lead to misleading results. Sampling occurs when Google Analytics has to estimate data because there is too much information to process. This could result in inaccurate reporting, especially when you’re looking at large datasets.
By setting up Google Analytics properly from the start, you reduce the chances of data sampling, ensuring that you’re always working with accurate, real-time data. This helps you make better decisions and avoid any confusion caused by estimated figures.
Why is matters?
Setting up Google Analytics correctly is essential for obtaining actionable insights that drive your business growth. Misconfigured accounts can lead to incorrect data, inefficient marketing spend, and missed opportunities. The sooner you fix mistakes, the less time and resources you waste. By ensuring that your Google Analytics account is set up correctly from the start, you can make better data-driven decisions, improve your web and app and website’s performance, and maximize your return on investment.
At Online Marketing Gurus, Australia’s Leading Digital Marketing Agency, and the top Australian SEO services agency, we specialize in ensuring that your Google Analytics account is optimized and provides accurate, valuable data. Contact us today for a professional audit and setup that ensures you’re making the most of this powerful digital marketing tool.
In this post, we break down 18 of the most common mistakes we see on a daily basis and how to correct them (or avoid them altogether).
Exploring 18 Google Analytics tracking mistakes and how to fix and / or avoid them all together:
#Mistake 1. Tracking your own sessions
Your team probably spends a lot of time on your website. If you count these into your reporting, it can inevitably skew your Google Analytics data by making it look like you have more web visitors than you actually have, or that you have higher average session durations than you actually do.
How to fix this common mistake: Create an IP address filter to exclude internal traffic from Google Analytics. You can do this by first obtaining your IP address by searching “what is my ip address” on Google. Once you’ve got this, create a filter that excludes this IP address like so:
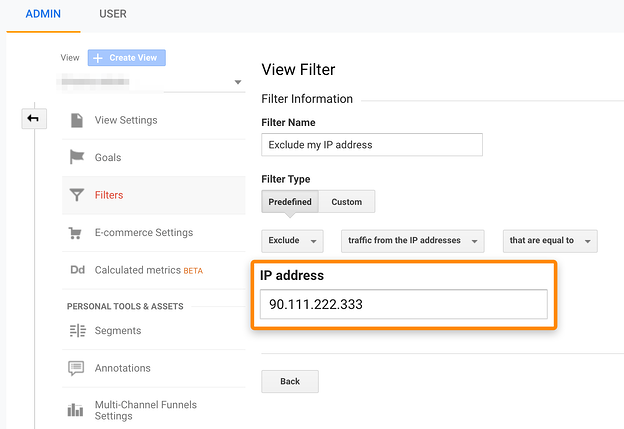
To exclude multiple IP addresses, follow this handy guide by Google.
#Mistake 2. Not including a bot filter
While we’re on the topic of filters, forgetting to exclude traffic from bots is another one of those common Google Analytics mistakes that marketers make.
Unfortunately, every website gets bot traffic. In fact, a survey by Databox found that more than half of all marketers say their website generates bot traffic daily or weekly.
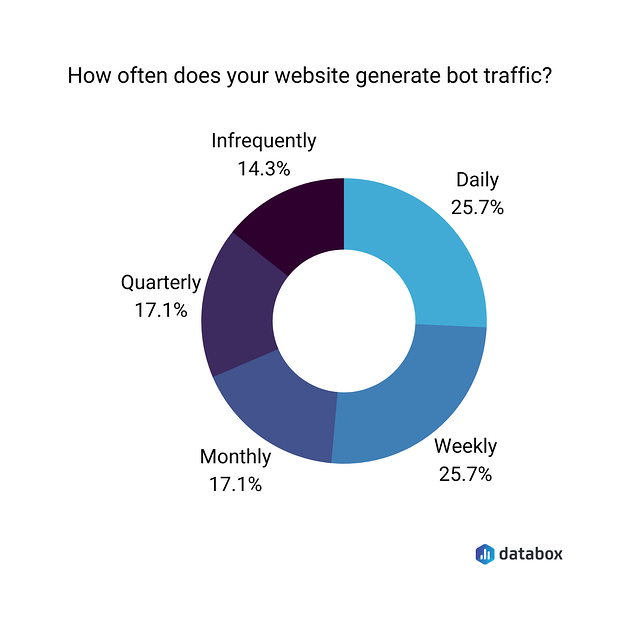
Including these in your reporting causes a host of issues, including an overinflation of total website traffic, lower engagement levels, and a lower conversion rate. What’s worse, you might end up basing decisions on this “increase” in traffic — leaving you in for a host of disappointment.
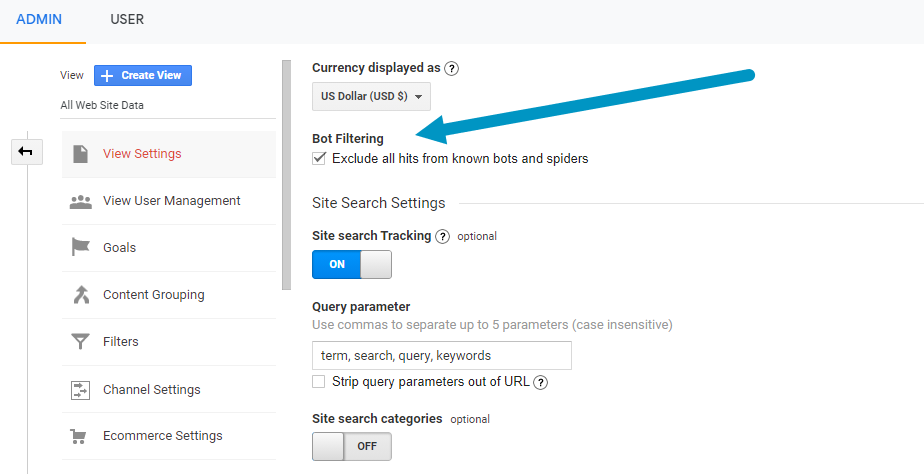
How to fix it: This one’s a relatively quick fix. Go into the Admin section of Google Analytics and click on “View Settings”.
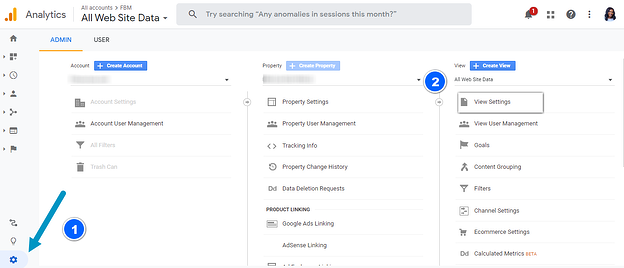
Once you’ve in, click “exclude all hits from known bots and spiders”.
#Mistake 3. Having more than one Google Analytics code
This one seems unlikely, but it’s actually one of the more common Google Analytics mistakes. There are a number of reasons why a website might have a duplicate Google Analytics tracking code:
- You have more than one CMS in place
- You have a hard-coded and Google Tag Manager implementation
- You’ve left old tracking codes on your pages
- You’re using internal UTM parameters
These kinds of mistakes lead to artificial inflation of your Analytics data because Google will be tracking every interaction twice. And, like spam or bot traffic, basing your decision or reporting on this information could spell trouble in the long run because these double-ups won’t reflect in your bottom line.
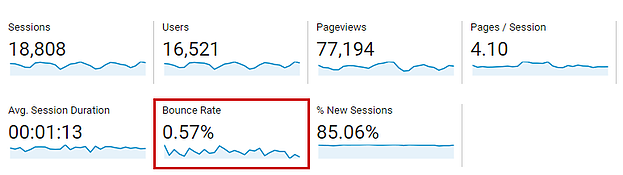
How to fix it: Duplicate Google Analytics codes won’t be obvious at a first glance, but one of the best ways to detect this is by looking at your bounce rates. Having a near-zero bounce rate (i.e. 1-3%) could be a sign that you have some double-ups on your website.
If you want to drill down to see if individual pages have a duplicate tracking code, you can do this by going to Behaviour > Site Content > Landing pages and sorting by bounce rate.
After you’ve found the culprit, use the GA Debug chrome extension to check out what’s happening on those pages.
#Mistake 4. Missing Google Analytics code
Having a missing Google Analytics tracking code on your website means that you won’t be gathering ANY data on performance. This is one of those mistakes that could happen if you switched your website theme and forgot to update add the Analytics code, or because you’re using multiple CMS.
How to fix it: Google Analytics does have a built-in missing Google Analytics tracking code notification, but it’s slow and can be easy to miss. Be sure to check your notifications regularly by clicking on the top right-hand corner like so:
Another solution is to use Screaming Frog to scrape your website for Google Ads’ Google Tag Manager and Google Analytics codes like so:
#Mistake 5. Missing or incorrect set-up of interaction events
Interaction events mark crucial milestones along the customer journey. You might track use event tracking for when a user submits a form, plays a video, hovers over a promotional banner, or clicks on one of your product pages. When you have this raw data on hand, it’s easy to identify precisely where your customer funnel is letting you down and rectify it to win more conversions from your site traffic.
However, there are some cases where you may be setting up interaction events for tracking events that are automatically accounted for on each page (such as scroll depth tracking). This little oversight could lead to unrealistically low bounce rates across your entire website.
How to fix it: If you’ve doubled up on interaction events and tracking events, you can easily fix this in Google Tag Manager. Go into your tag configuration, scroll down to “Non-interaction hit”, and change this from “false” to “true”:
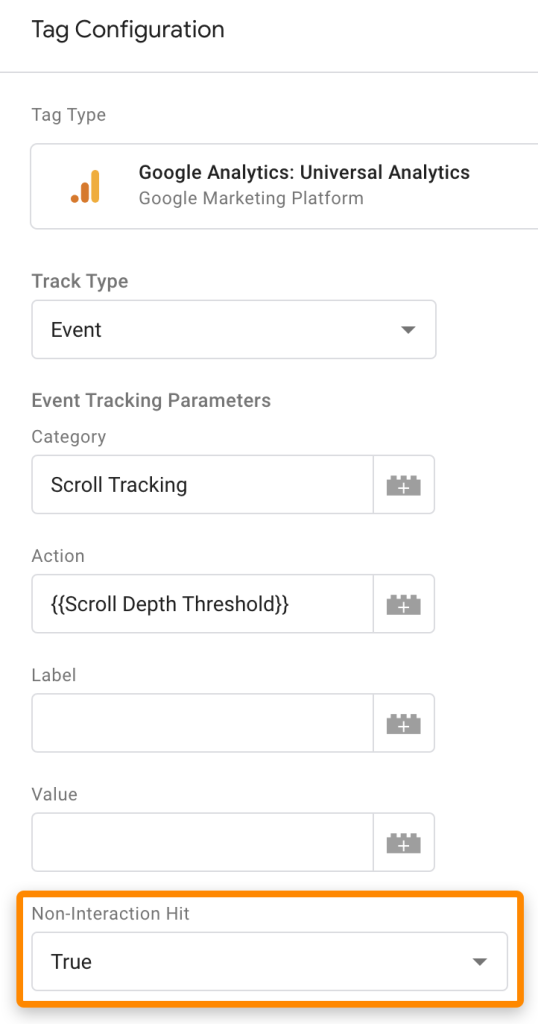
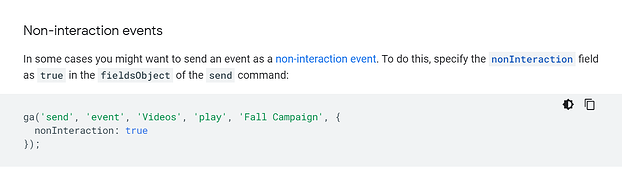
If you’re just using Google Analytics, this can be done by adding in an additional line of code:
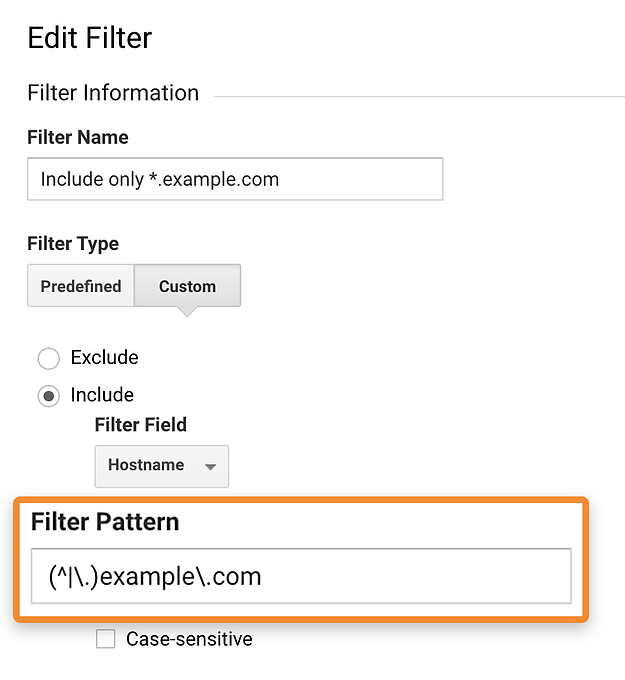
#Mistake 6. Tracking traffic from other domains
Your Universal Analytics code is visible to everybody. Someone could open up the source code on your website, copy your tracking code, then start recording traffic under your domain.
While the reasons behind WHY someone would go into your source code and do this remain a mystery, it’s still important to take preventative measures to ensure you’re only tracking data from your own property.
How to fix it: Once again, we go back to the filter. Go into View Settings and Click on Edit Filter. Set up a filter to only include traffic from your domain, and you’re good to go.
#Mistake 7. Including spam referral traffic
Spam traffic isn’t the same as bot traffic, but it’s equally undesirable. If you’re running a popular website, you might find that other websites point spammy links back to your domain. While most of these amount to very little, some could drive traffic in the hundreds or even thousands.
Thankfully, these are easy to search for. Go into your Google Analytics Referrals report by navigating to Acquisitions > All Traffic > Referrals. From here, you’ll see a list of all of the websites driving traffic back to your domain, like in this example:
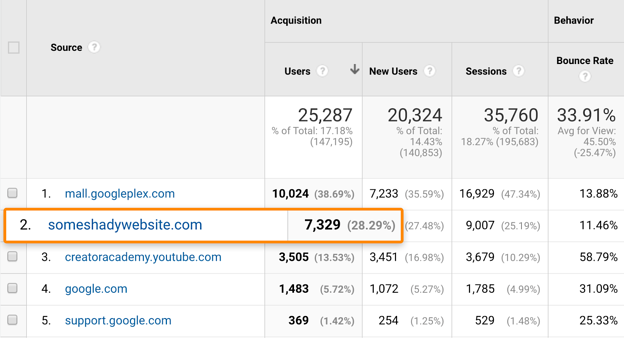
If you’re seeing a website with a weird URL, chances are it’s probably spam referral traffic. Another way to do it is to filter by referrers with a near-100% bounce rate or more than 10 users per session.
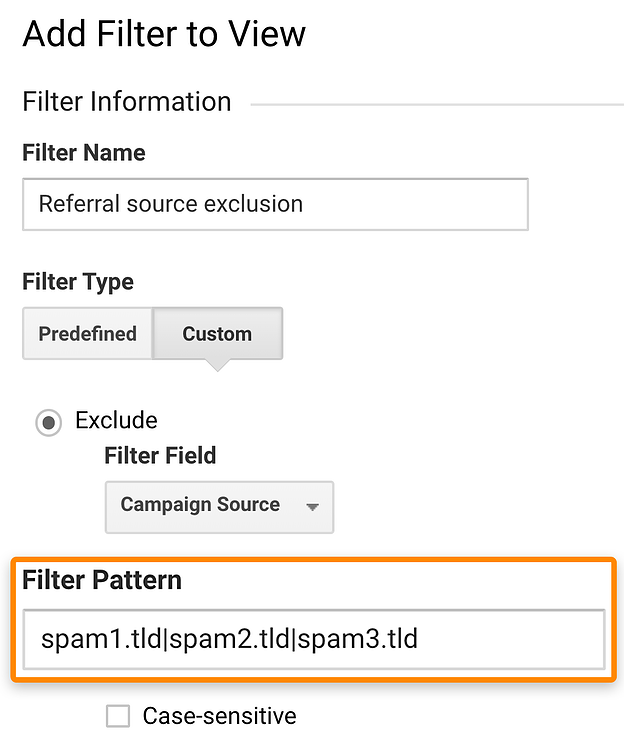
How to fix it: Make a note of all the spam referrers that you’ve found. Set up a filter by campaign source, then list these domains as filters:
Lastly, don’t click on the link as it might leave your computer susceptible to viruses or malware.
#Mistake 8. Tracking self-referral traffic
Your own domain shouldn’t be showing up in your referral reports. If it is, it means you’ve made the mistake of tracking self-referral traffic.
Self-referrals primarily occur because of two reasons:
- One session could have been split into two while moving around your site. For example, a cookie could have been stored on blog.domain.com but you then ended up moving to another URL like shop.domain.com.
- A session was started on a page without a Google Analytics tracking code, but the user then moved on to a page with a tracking code. The only data that Google Analytics has on that source of referral traffic is your website, so it records it as a self-referral.
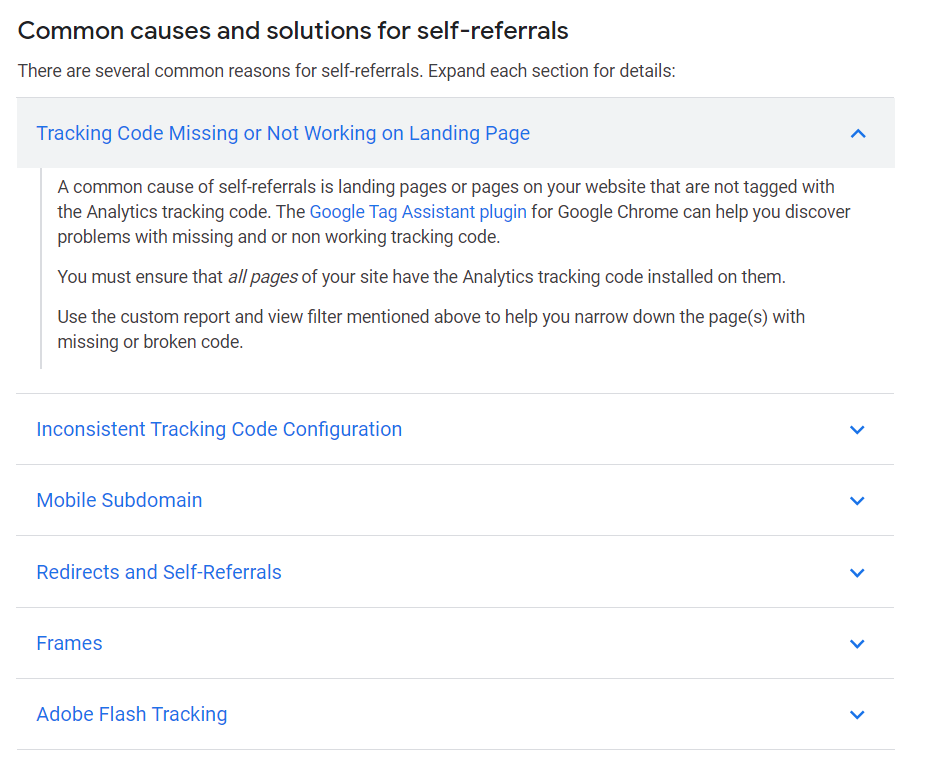
How to fix it: Debug your website following these instructions from Google. This list includes detailed explanations of why self-referrals occur and how to fix them:
#Mistake 9. Using UTM parameters incorrectly
UTM parameters are helpful when collecting data for a specific campaign or referral. However, these are also commonly misused by marketers — particularly when linking from one internal page back to another.
Internally linking with UTM parameters can skew your attribution efforts and mess with your session data. On top of this, it’s a wasted effort because all of this data is already available to you in Google Analytics.
How to fix it: Remove any UTM parameters on your own website and opt for one of these options instead:
- Use the page path analysis feature in Google Analytics to see the previous steps a user took before landing on your ending page. This can be done by setting your campaign page as your ending point and reviewing the different pages that drove traffic to that destination.
- Create an internal link parameter (“ITM parameter”) and use GA’s custom dimensions feature to track these traffic sources. Smashing Magazine has an incredibly helpful and detailed breakdown of the process.
#Mistake 10. Forgetting to exclude query parameters
Sticking with parameters — creating further parameterised URLs for your landing page is a surefire way to mess with your tracking and make it difficult to dig deeper into your data. These URLs will break up one landing page into multiple rows when reporting, like in this example:
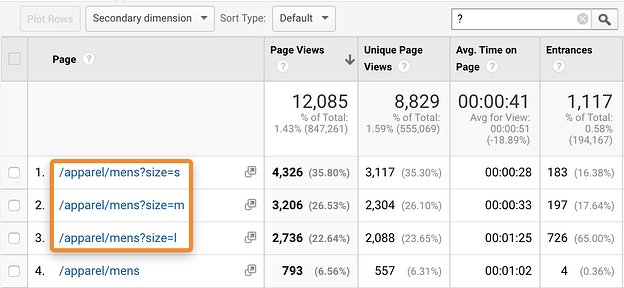
How to fix it:Use your report filters to search for any parameterised URLs (ones with a “?”):

At a glance, you’ll be able to spot whether one landing page is being splintered off into multiple pages.
If you notice this error happening, simply exclude parameters that you don’t want to see in your View Settings:
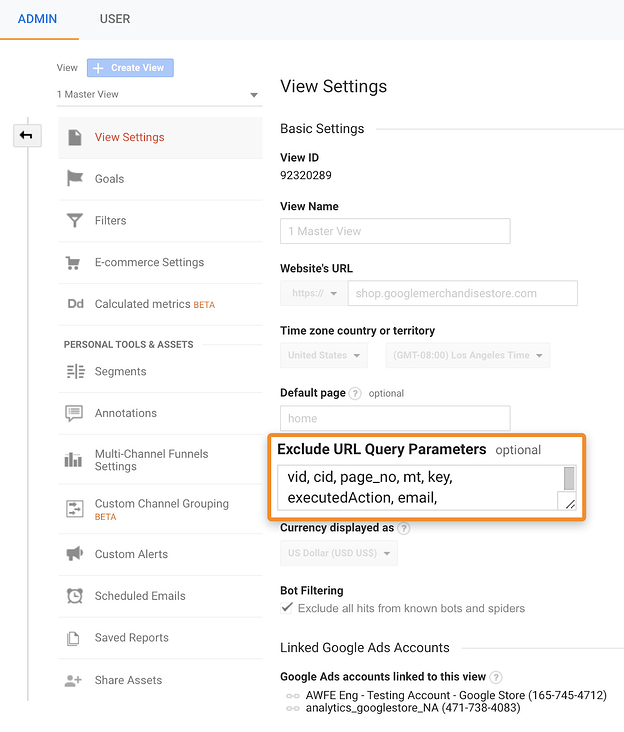
Be mindful not to exclude any parameters that you ARE using, like search query parameters, UTM parameters, or ones that you’ve created to track specific campaigns.
#Mistake 11. Not using site search reports
This isn’t mandatory, but it is extremely helpful — particularly for eCommerce sites. If you have a search function on your website, these search reports are a valuable way to gain insights into which products are the most popular, what content users are interested in, and where there are opportunities to create new content.
These reports look like this:
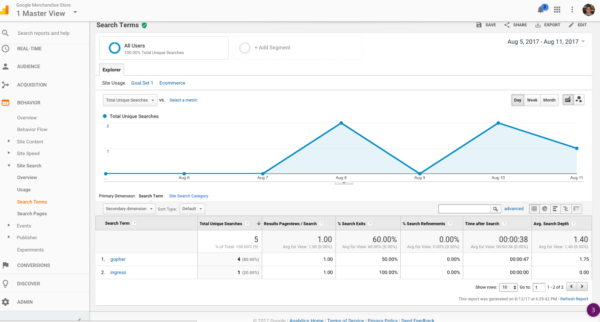
You can set up site search reports by going into your Google Analytics account, navigating to the view where you want to set up site search, and turning tracking to “ON”. Once you’ve done this, you’ll need to enter the words that designate internal query parameters — Google has more detailed information on the process in this article.
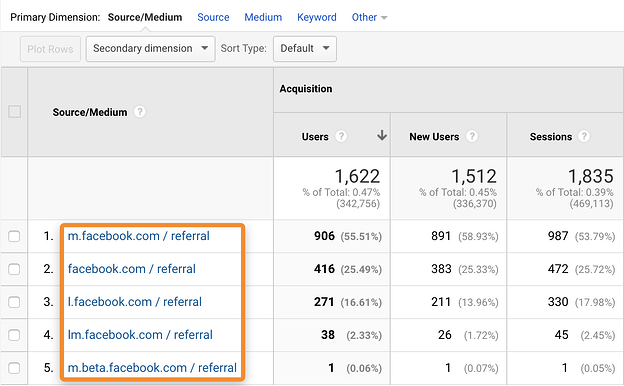
#Mistake 12. Forgetting to merge your source and your medium
Most marketers think that the source and medium are the same things — and if you’re making this error, it’s not hard to see why. If you haven’t merged your traffic source and medium, you’ll end up with Google Analytics reports that look like this for Facebook or Google AdWords:
How to fix it: Use filters to merge all your referral traffic from a single domain like in this example:
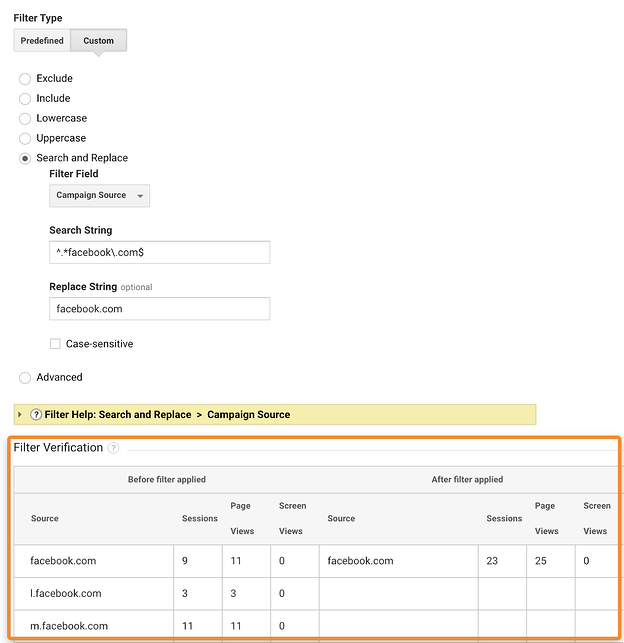
Unfortunately, these filters aren’t retroactive so you’ll still have historical data containing all of these different sources. Last but not least, don’t forget to test your filter before implementing it, and add a note in your back end so everyone on your team knows exactly why there’s been a change in source and medium traffic.
#Mistake 13. Not using annotations
Not using annotations won’t mess up your tracking data, but it sure is handy when you’re looking back and reflecting on what happened on any given date. Annotations are the perfect way to track any spikes or dips in traffic, or evaluate the success of an offline campaign or a new sale.
In Google, they look like this:
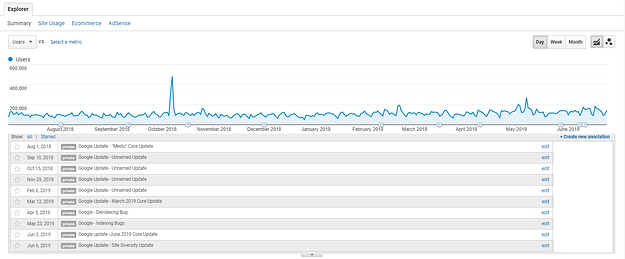
Source: Search Engine Watch
How to fix it: Start using annotations ASAP. You can do this by navigating to any graph report, then clicking on +Create new annotation:
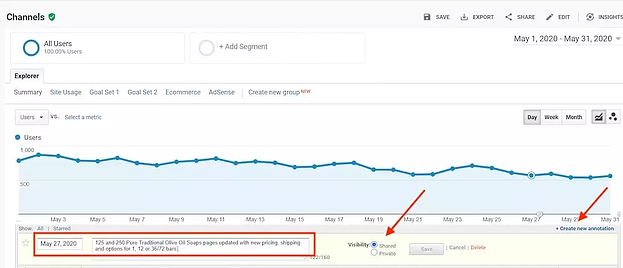
Image source: Practical eCommerce
Keep in mind that you can create both shared and private annotations, depending on the nature of what you’re noting down. Private annotations are only visible when you log in to Google Analytics, whereas shared annotations can be seen by anyone who has access to the reporting view.
#Mistake 14. Cross-domain tracking
If you’re not using cross-domain tracking, you’re missing out on a huge chunk of data about user behaviour. Cross-domain tracking allows you to see sessions on two related websites that you own, such as your eCommerce site and shopping cart site or a campaign mini-site.
Without cross-domain tracking, your website data looks like this:
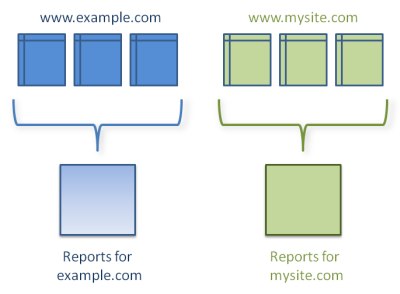
Image source: Google
With cross-domain tracking, you consolidate all of this data into a simple report like so:
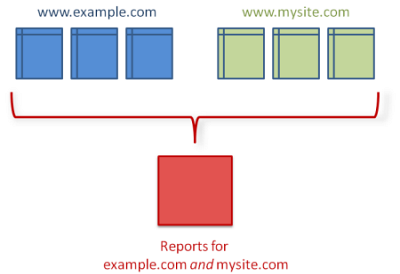
Image source: Google
If you have subdomains like blog.mysite.com or help.mysite.com, you can also set up subdomain tracking:
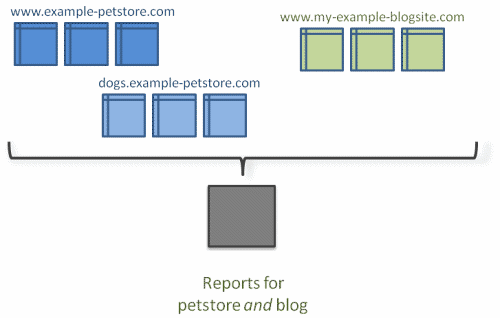
Image source: Google
How to fix it: The way you set up cross-domain tracking in Google Analytics differs depending on the scenario. There’s one way to do it if you’re tracking multiple domains, another for tracking this AND sub-domains, another for tracking a domain and a sub-directory…you get the idea. Luckily, Google has a support page that outlines detailed steps for every type of cross-domain tracking, which should include all the information you need to get started.
#Mistake 15. Tracking PII from your site traffic
Your site should NOT, under any circumstances, be tracking personally identifiable information (PII). These include phone numbers, email addresses, or even the names of users visiting your site.
You may not be doing this knowingly. The trouble is, you could be generating this PII by accident simply by creating URL parameters that contain personal data. This is particularly common when you’re working with forms:

Google takes this stuff VERY seriously. If you’re caught gathering PII, Google will send you an email notifying you of the breach. Ignore this, and you might find yourself in a whole heap of legal issues.
How to fix it: Don’t risk it, period. However, if you are concerned you’re passing on sensitive information, follow these steps to check for PII in Google Analytics.
Navigate to Behavior > Site Content > All Pages, and type in the filter “@”. This will bring up any page views that include email addresses like so:
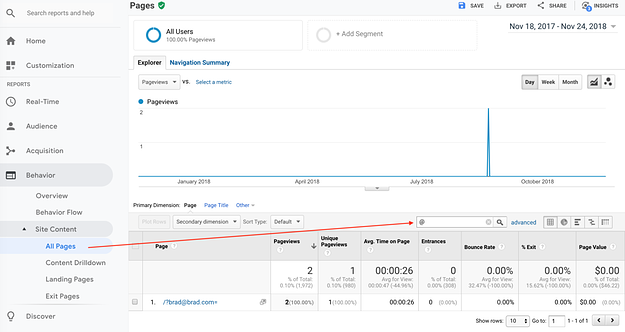
You can also use the GA Debugger Chrome Extensionand look for names, phone numbers, addresses, or emails.
#Mistake 16. Not setting up custom goal / conversion tracking
The end game of your website is to generate leads or sales. If you’re not tracking this, you’re missing one of the MOST important pieces of data in Google Analytics. You won’t know how many of your site visitors ultimately made a purchase with you, or how many filled out a form. You won’t know which sources convert the best. And you absolutely won’t be able to draw any kind of conclusion on how you should invest your time and money in the future.
How to fix it: Create goals and conversions for key points in your customer journey, such as when they navigate to your “About us” page or sign up for your newsletter. When you’re getting everything set up, be sure to check that all of your codes and triggers are set up right. Having conversion triggers firing at the wrong time or multiple times can cause a ton of headaches and skew your data.
#Mistake 17. Only using one view
This applies even if you’re only using Google Analytics for one site domain. You should always, always, ALWAYS have at least three different custom views for your site traffic: your master view, a backup of your master view, and a testing view where you can play around with filters or more sophisticated settings.
How to fix it: Log into your GA account and go to Admin > View Settings. Hit +Create View to create a new view. Follow the prompts to set u your view, then give it a name like Master View, Backup View, Testing View. You’ll then see all the views in your Google Analytics reports like so:
Image source: Monster Insights
#Mistake 18. Not testing your Google Analytics set-up
You should ALWAYS test your tracking set up before using it to guide your decision-making. Most Google Analytics mistakes occur when you don’t correctly set up your tracking and analysis, which can mess with ALL of your data.
“Your first step should be setting up Google Analytics, so it will report back to you what we call as “useful version of the truth.” For example, if you aren’t properly tagging your traffic with UTM’s, that’s the priority. Only then will the “Source/Medium” reports start to provide really useful details. If you have UTM’s all setup, then move on to goals. That way, that same “Source / Medium” report will not only tell you where your visitors are coming from, it’ll start telling you just how effective those traffic sources are.”
– Chris Mercer, measurementmarketing.io
Before relying on your Google Analytics as your “truth”, it’s worth checking that all of your conversions are firing correctly, tags are installed correctly, and you’re not racking up tons of spam/bot traffic.
How to fix it: Use incognito browsing or browse your site from a different property. Visit different pages, do test purchases, fill out forms, and click on your most frequently visited pages. After you’ve done this, go into Google Analytics and see if this data has been correctly reported on. You can also use the real-time Google Analytics reports view to check that everything’s working as it should while you’re browsing.
Image source: Monster Insights
After you’ve checked that everything’s working as it should, don’t just set and forget. Pencil in time to conduct regular check-ins on your reports, and do a full audit of your reporting every now and then. This will help you get ahead of any issues before they have too much of an impact on your Google Analytics data.
Maximise conversions, leads and sales with Google Analytics
Setting up your Google Analytics account correctly can be tough, but it is absolutely worth doing. By fixing these common Google Analytics tracking mistakes, you’ll be well on your way to collecting accurate data that can guide future marketing investment and supercharge your ROI.
Once you’re collecting the right kind of data, it’s time to use that information to work. We’ll use Google Analytics data to pinpoint opportunities to increase your conversions, track the success of your digital marketing campaigns, and set you on the path to online domination.
You might want to review our guide to looker studio / Google data studio and Google Search Console (GSC) – A Comprehensive Guide

About the Author
Andrew Raso
Share